How to Make Sourdough Focaccia
A good focaccia has a crisp top and a light, soft crumb flavored with olive oil and toppings of your choosing. This focaccia is leavened with sourdough starter and it couldn’t be easier.

It’s been nearly six years since I first tried my hand at sourdough focaccia. My first attempt at leavened Italian flatbread was of the thinner variety, more closely resembling pizza (focaccia’s cousin), quite different from the lofty, fluffy focaccia that’s more popular stateside. I’ve learned since that while there are regional variations in toppings (plain to loaded), type (savory or sweet), shape (rectangular or round) and thickness, the Ligurian focaccia is regarded as the original. In fact, when we think of focaccia we usually mean focaccia (fugassa) all genovese with its dimpled top lightly golden and crisp and boasting a light, soft crumb. The preferred thickness is no more than two centimeters (roughly 3/4 inch) and this is what I set out to achieve for my recent bakes.
The Sourdough Focaccia Process
Before attempting a different type of bread I create an outline of the major steps to understand it. I’ve found that in many cases the process is very similar. For focaccia the steps are: mix the dough, stretch and fold (replaces kneading), bulk fermentation (first rise), overnight cold retard (for flavor development, optional), final proof (second rise), bake. Compared to a basic rustic loaf, focaccia is much easier because there’s no shaping involved. What’s important is to allow the dough enough time to rise properly to get a nice, light crumb.
Most focaccia is leavened with commercial yeast but the use of wild yeast is not uncommon. The main difference between the two is time. Breads leavened with sourdough starter will always take longer but better flavor is our reward for the wait.
That said, while this focaccia is a two-day process like most of my bread recipes, it’s perfectly okay to make it a same-day bake. The primary purpose of the overnight rest in the refrigerator is to allow the dough to develop more flavor (and also to break the process up in two segments) but this is optional. You can mix the dough in the morning (feed your starter the night before) and serve a warm focaccia in the evening. If you’re new to sourdough baking focaccia is a good recipe to start with–it’s very flexible.

Notes and Tips on Sourdough Focaccia
- Hydration: Higher hydration dough (80%+) is best for focaccia. Since there’s no shaping required for the final product you don’t have to worry about delicate handling but the wetter dough will make the stretch-and-fold process easier and you’ll have a better chance of getting a light, soft crumb. The focaccia recipe here is roughly 87% hydration.
- Fermentation: The dough requires two rising times, the main bulk fermentation and the final proof so it’s better not to let the dough fully proof on the first round, especially when you’re baking focaccia on a warmer day (dough temperature 78ºF and over). You want the dough to have enough rising power during the final proof to get the coveted bubbles and also for oven spring during baking. The good thing is this recipe is flexible. After the stretch and fold sessions, continue with bulk fermentation until the dough rises about 50% before storing it in the refrigerator overnight. If timing is an issue, it’s okay to refrigerate the dough immediately after your last stretch-and-fold. The final proof time will just be a little longer.
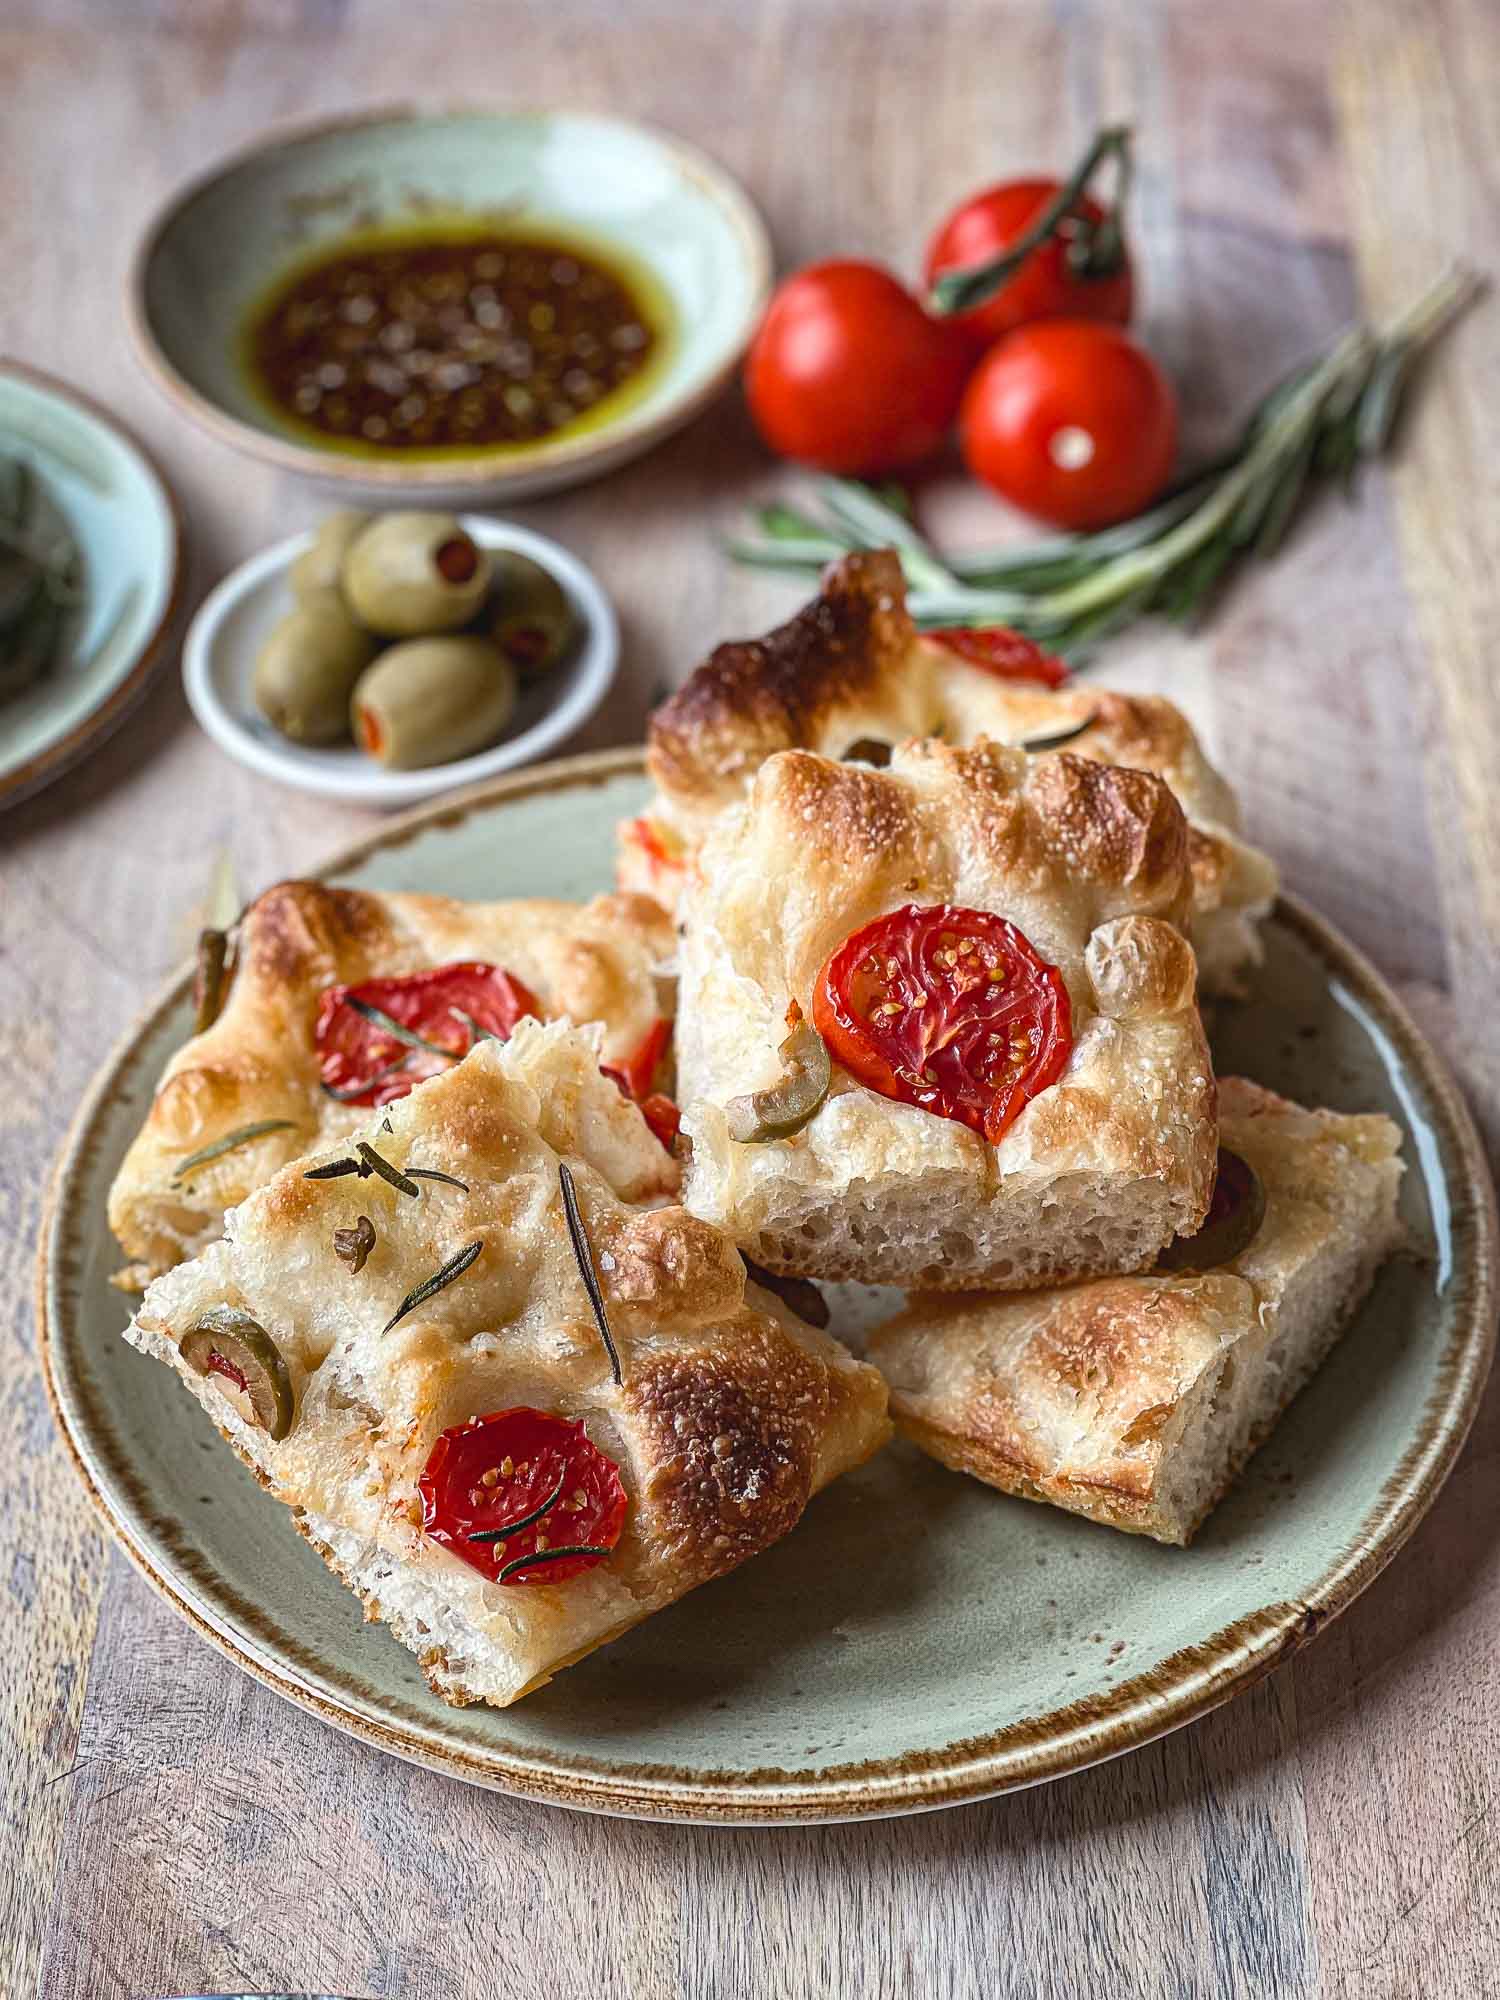
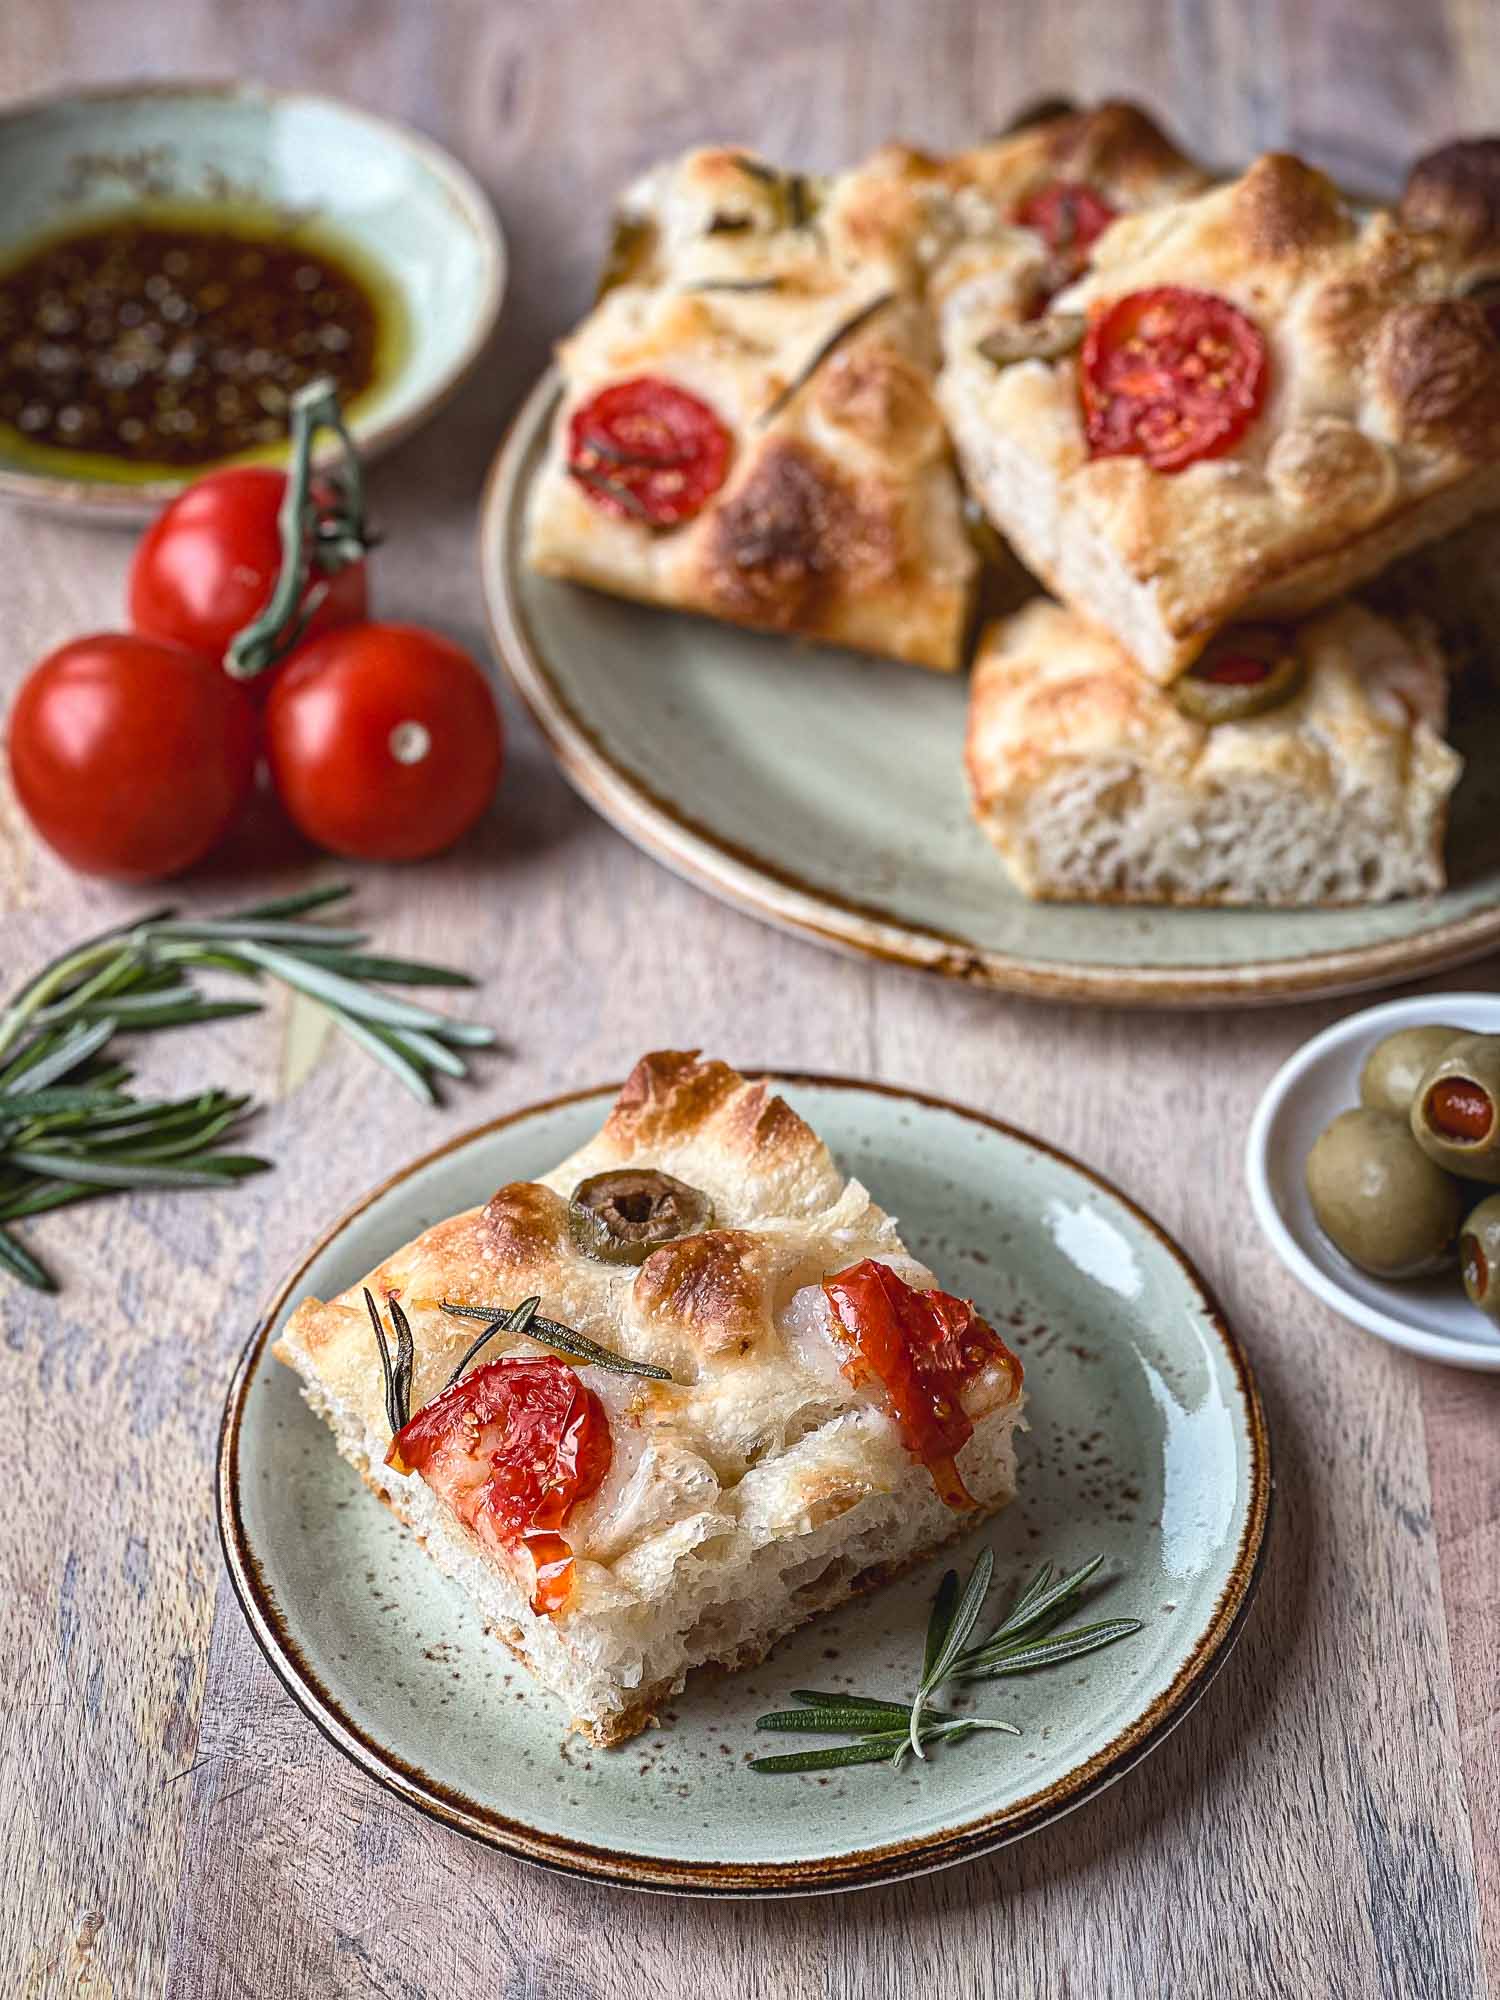
- Toppings: You can keep it simple with just olive oil, coarse salt and/or fresh rosemary but you can have fun with your toppings. Here I’ve added olives and tomato slices but you can add your favorite vegetables and herbs.
- Baking: It was by luck employing what I’ve learned from my years baking sourdough bread that I spritzed the top of the focaccia dough with water during one of my bakes. I learned later that focaccia bakers will often pour a salt and water brine or spray the top of the dough with a mixture of water, olive oil and salt so a crust doesn’t form too early. Another way to incorporate moisture for oven spring and to prevent a crust from forming prematurely is to have a separate baking pan with hot water for steam during part of the baking time.
- Baking Pan Size: I used a 10×15-inch baking pan for this recipe and for the ingredient amounts below my focaccia was 1 3/4 inches at its tallest (in the middle). I mention this only because most quarter sheet pans are 9×13 inches and if that’s what you happen to have, your focaccia will be taller. This is no problem at all but neither your focaccia nor mine will likely pass the focaccia all genovese height test. It will still be delicious, though.
- Baking Schedule: If you want to mix the focaccia dough first thing in the morning, feed your starter the night before so it’s ready in the morning.
- Leftover Focaccia: Leftover focaccia can be refrigerated and it will keep for a few days. You can refresh it by warming a few minutes in the oven (200-250ºF). Plain sourdough focaccia can be cut up in cubes and makes wonderful croutons.

Sourdough Focaccia
A good focaccia has a crisp top and a light, soft crumb flavored with olive oil and toppings of your choosing. This focaccia is leavened with sourdough starter and it couldn't be easier.
Ingredients
Sourdough Focaccia Dough
- 440 grams bread flour
- 375 grams water
- 90 grams active starter (see note)
- 10 grams kosher salt
- 22 grams olive oil (about two tablespoons)
Toppings
- more olive oil for drizzling before baking (few tablespoons)
- tomato slices (one to two small tomatoes)
- sliced olives (handful)
- chopped fresh rosemary (few sprigs)
- kosher salt or sea salt for sprinkling
Dipping Sauce (Optional)
- olive oil
- balsamic vinegar
- 1-2 cloves fresh garlic, crushed
- fresh or dried herbs
- salt and pepper
Instructions
-
Day 1, Mix the Dough: Combine the dough ingredients above in a bowl and mix well. Cover and let sit for thirty minutes to one hour.
-
Stretch and Fold: Perform four stretch and fold sessions every thirty minutes over the course of two hours. One stretch and fold session involves picking up one portion of dough and folding it over itself, giving the bowl one quarter turn, taking a portion of the dough and folding it over itself again until you've done four fold overs, one complete rotation. Cover the dough.
-
Bulk Fermentation: After the stretch and fold sessions, continue with bulk fermentation until the dough has risen roughly 50%, a little more or less is fine. The total bulk fermentation time will depend on dough temperature. Below 75ºF it could take more than two hours after the last stretch and fold session.
-
Overnight Cold Retard: After bulk fermentation you can transfer your dough to the refrigerator (make sure it's properly covered with a bowl lid or plastic. (Alternatively, you can skip this step and move on to the final proof step. You can also extend the cold retard longer than overnight. You can final proof and bake on Day 3 if you wish.)
-
Day 2, Final Proof: Drizzle two to three tablespoons of olive oil and spread to coat the inside of a quarter baking pan. Take the refrigerated dough and transfer it to the oiled pan. Gently flatten and spread the dough to the edges of the pan. The dough will be cold and spring back so you can cover, let it rest and try again in a few minutes. Cover the dough with plastic wrap and let it rise until bubbly on top. This could take one to two hours.
-
Add Toppings and Bake: Preheat your oven to 425ºF. When your dough looks airy and bubbly on top, remove the plastic wrap and spritz the top of the dough lightly with water. Drizzle a few more tablespoons of olive oil over the top and press the dough with your fingers to create dimples. The dimples should be deep enough so their impressions remain after baking. Sprinkle a little salt over the top, arrange the tomato slices and olives and sprinkle the fresh rosemary. Bake for 20-25 minutes or until the surface of the focaccia is lightly crisp and golden. Serve warm.
Recipe Notes
Sourdough Starter: For this recipe, I feed my starter in the morning and mix the dough around midday. If you want to mix the dough first thing in the morning, I recommend feeding your starter the night before so it’s ready in the morning.


YUM!!!!!
Look forward to seeing you in Sun Valley!!
Pam & Chip
Hi, Pam! Looking forward to seeing you, too!
This was so delicious! Ive made a lot of sourdough loaves and ive made focaccia with conventional yeast so I was excited to try it with my sourdough starter. I could have used a bigger pan because it was definitely very fluffy! and I needed to poke the dimples I MUCH deeper, they barely showed when it was done cooking. Also I didn’t have a way to sprintz with water but I found using a pastry brush and brushing water on worked well! Will definitely be making this again.
So glad this recipe worked for you, Emmalie. Your pastry brush idea is great! Thanks for the tip for all of us and for the nice feedback. 🙂