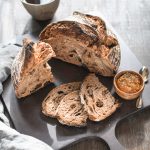
Chocolate-Raisin Sourdough Bread Using Unfed Starter
If you're looking for a simple, straightforward way to make sourdough bread, this is the recipe. Using unfed sourdough starter and proofing your dough in the fridge until you're ready to bake it--doesn't get more flexible than this. Feel free to omit the cacao powder and raisins for a plan sourdough loaf.
Ingredients
- 85 grams unfed starter (at room temperature)
- 460 grams bread flour
- 367 grams water (90-95ºF)
- 10 grams raw cacao powder
- 5 grams kosher salt (use up to 10 grams for flavor)
- 55 grams raisins (soaked for 30 minutes; use more if you like)
Instructions
-
Day 1 (morning): If you store your starter in the refrigerator, take 85 grams and allow it to come to room temperature, about one hour. Make sure you have enough starter leftover to feed and store for future use.
-
Day 1 (morning; Mix the dough): Stir in the unfed starter and water in a bowl. Once the starter has been evenly distributed in the water add the bread flour and cacao powder (if using). Cover the bowl with a kitchen towel or plastic wrap and let sit for one hour.
-
Day 1 (morning): Add the soaked and drained raisins and kosher salt to the mixture in the bowl. Combine the dough using a wet hand and folding the dough over from the bottom to top. Then Ken Forkish employs what he calls the “pincer” method to make sure all the ingredients are fully incorporated. Imagining your hand as a lobster claw (my description), cut through the dough pinching a few times, mixing, then pinching again.
-
Day 1 (morning; stretch-and-fold). Pick up one portion of the dough (without taking it out of the bowl) and fold it over. Repeat this folding step a few times, inverting the dough with the folds at the bottom of the bowl when done. This stretch-and-fold step should be done every thirty minutes, three or four times over the course of two hours. After the final stretch-and-fold, cover the bowl with a towel or plastic wrap to for bulk fermentation.
-
Day 1 (evening; testing for completion of Bulk Fermentation): Depending on the temperature of your kitchen your dough should have doubled in size eight afters after stretch-and-fold. A warmer kitchen would take less time and a cooler one, more time. You should see bubbles throughout the dough if you're using a clear container and if you pull the dough a little it should be webby underneath.
-
Day 1 (evening; shape and overnight proof): Transfer the dough to a lightly floured surface. The dough will relax and flatten when you take it out of the bowl. Taking one section of dough at at time, fold the sections over the rest of the dough until you have a somewhat tight ball shape. Then tighten the dough by pulling it towards you by cupping the dough with both your hands using your pinky fingers as the anchors. Tension is created on the surface of the dough as you pull it towards you. Rotate then repeat three to four times until the dough holds its ball shape. Transfer the dough on a floured banneton with the seam side down. Cover the entire proofing basket with a plastic bag and store in the refrigerator overnight. For my loaf, my dough proofed in the fridge for nineteen hours. It should be fine to bake the next morning. To test for readiness, poke the dough with a floured finger, making about a 1/2-inch indentation. If the dent springs back immediately, the dough needs a longer proofing. If the dent springs back slowly and doesn’t completely disappear, the dough is ready to bake.
-
Day 2 (bake): This recipe uses a dutch oven for baking. Preheat your oven to 475ºF with a rack in the center of the oven. Put the dutch oven with the lid on the rack while the oven preheats. Once the oven has reached temperature, take the dough out of the refrigerator and invert it onto a piece of parchment paper, leaving enough paper on either side to be able to lift it. Make sure you have oven mitts then take the (very hot) dutch oven out of the oven and place on the counter or stove. Remove the lid and rest one of your mitts on top of the lid so you don’t touch it by accident. Take the ends of the parchment paper and carefully lift and transfer the dough to the dutch oven. Cover the dutch oven and place it back in the oven. Bake covered for 30 minutes then uncover and bake for another 20-25 minutes, checking your bread at the 15-18 minute mark just in case your oven runs hot. When done, tilt the bread out of the dutch oven and let it cool on a rack for at least 20 minutes before slicing.