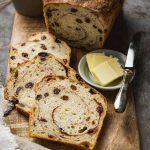
Sourdough Cinnamon-Raisin Swirl Bread
My childhood favorite cinnamon-raisin bread gets a sourdough makeover.
Ingredients
- 120 grams raisins (2/3 - 3/4 cup) soaked in warm water for 30 minutes then drained
- 230 grams sourdough starter (fed within the last 24 hours)
- 430 grams all-purpose flour
- 35 grams maple syrup (2 tablespoons)
- 4 grams kosher salt
- 245 grams water (lukewarm)
- 1 tablespoon ground cinnamon (See Note)
- 1/3 cup granulated sugar (See Note)
- neutral oil for coating bowl
Instructions
Mix and Autolyse (Please See Note Below)
-
In a large bowl combine all the ingredients--starter, flour, water, soaked and drained raisins, salt and maple syrup. Use a dough whisk, spatula or your hands to combine the ingredients. Turn it out on a lightly-floured surface and knead or use a bench scraper to smooth the dough as much as possible using a kneading motion (using your hands) or by scooping the dough from the bottom and folding it over itself (using a bench scraper). Lightly coat in oil the surface of the bowl you used to mix the ingredients and return the dough to the bowl. Cover with plastic wrap and let sit for one hour (autolyse)
Stretch and Fold
-
After the one hour autolyse, wet one of your hands (helps to prevent sticking), take one piece of the dough, stretch until the point of resistance then fold it over itself. Repeat this three to four times. Cover the bowl with plastic wrap again and wait 30 minutes for the next stretch and fold. Stretch and fold three times every thirty minutes over the course of one hour and a half. With each stretch and fold you will notice gluten development in the dough.
Bulk Fermentation
-
After the stretch and fold session allow the dough to continue to proof until it's ready for shaping. In a warmer kitchen (about 75ºF when I baked this loaf) the remaining proof time after stretch and fold will be roughly one to two hours (with a healthy, robust starter). One way to check for readiness is the finger-dent test. Dip your finger in flour and poke the dough. If the dough is slow to spring back or doesn't spring back completely, it's ready for shaping. [A cooler kitchen (in the mid-60s to low 70s) will require a little longer proof time. If you start this process in early evening and you have a cool kitchen you can leave your dough overnight. You can also store it in the refrigerator overnight to slow the fermentation and continue with shaping the following morning.]
Shaping and Final Proof (Please See Note Below)
-
After bulk fermentation carefully turn the dough out on a lightly-floured surface. As you coax the dough out of the bowl the top surface will become the bottom once it's turned out on the work surface. You'll want to de-gas the dough a little and stretch it to a rectangle shape but rather than using a rolling pin take two edges of the dough and gently pull them apart without tearing the gluten strands. Pull taking two edges at a time until you have roughly a rectangle shape or large square. Sprinkle the cinnamon-sugar mixture over the entire top surface of the dough. Next, fold the wide part of the dough in thirds by taking one side and folding it two thirds of the way over then taking the other side and folding it over the already-folded side. Then roll the dough starting with one of the ends until you have a log. Pinch the seams. Spray a loaf pan with cooking spray or rub with oil and transfer the rolled dough seam side down. Cover with plastic wrap and allow to proof for one more hour. You should see a visible rise to the dough during this time.
Bake
-
Preheat your oven to 425ºF. Make one slash along the length of the dough, off the side a little) then put it in the oven. Bake for 10 minutes then reduce the temperature to 400ºF. Bake for another 30-40 minutes or until the loaf is golden brown or the loaf registers 180ºF in the center. Transfer to a wire rack and cool then enjoy as is or toasted.
Recipe Notes
Bulk Fermentation Time: Your fermentation time will depend on your kitchen temperature. The shorter proof time for this recipe (compared to my other sourdough recipes) was due to the unusually warm temperature in my kitchen on this day, about 75ºF.
Note added 6/24/22: 1. I've found kneading the dough after mixing is not necessary. 2. You can oil the bowl or not; for plastic bowls it's easier to leave the oil out and with glass or stainless steel, the oil helps to avoid sticking. 3. When stretching the dough out on the counter to add the cinnamon-sugar, you can either dust the surface with flour or mist with water as per my other sourdough recipes 4. After shaping the dough and allowing for some time for the last rise, you can cover the dough (already in the loaf pan) and store it in the refrigerator and bake the next day. None of these adjustments affect the final product.